This post is a personal record of my first hands-on experience setting up a Kubernetes cluster from early 2024 using K3s, a lightweight distribution of K8s. The goal is to run a somewhat “highly available” WordPress site.
This post is more like a tech diary than a proper tutorial. I hope it will help others who are starting from scratch like me.
Just a revision, why do we need a cluster?
Well, the short answer is simple: scalability and stability. One machine has limited performance, and it’s hard to improve unless we stop the server and change the hardware. A cluster spreads out the workload across multiple machines. Kubernetes (or K3s in our case) can automatically manage scheduling, resource allocation and recovering if something fails. This makes it possible to build real-world services, even across cheap Raspberry Pis.
“The Raspberry Pi website has been served from a Pi-powered cluster before.”
— Raspberry Pi Foundation
A short K8s introduction video from Bilibili inspired me. Here is the URL: https://geekhour.net/2023/12/23/kubernetes/
After we have gained the basic concepts, we can start our work now!
Here is my setup:
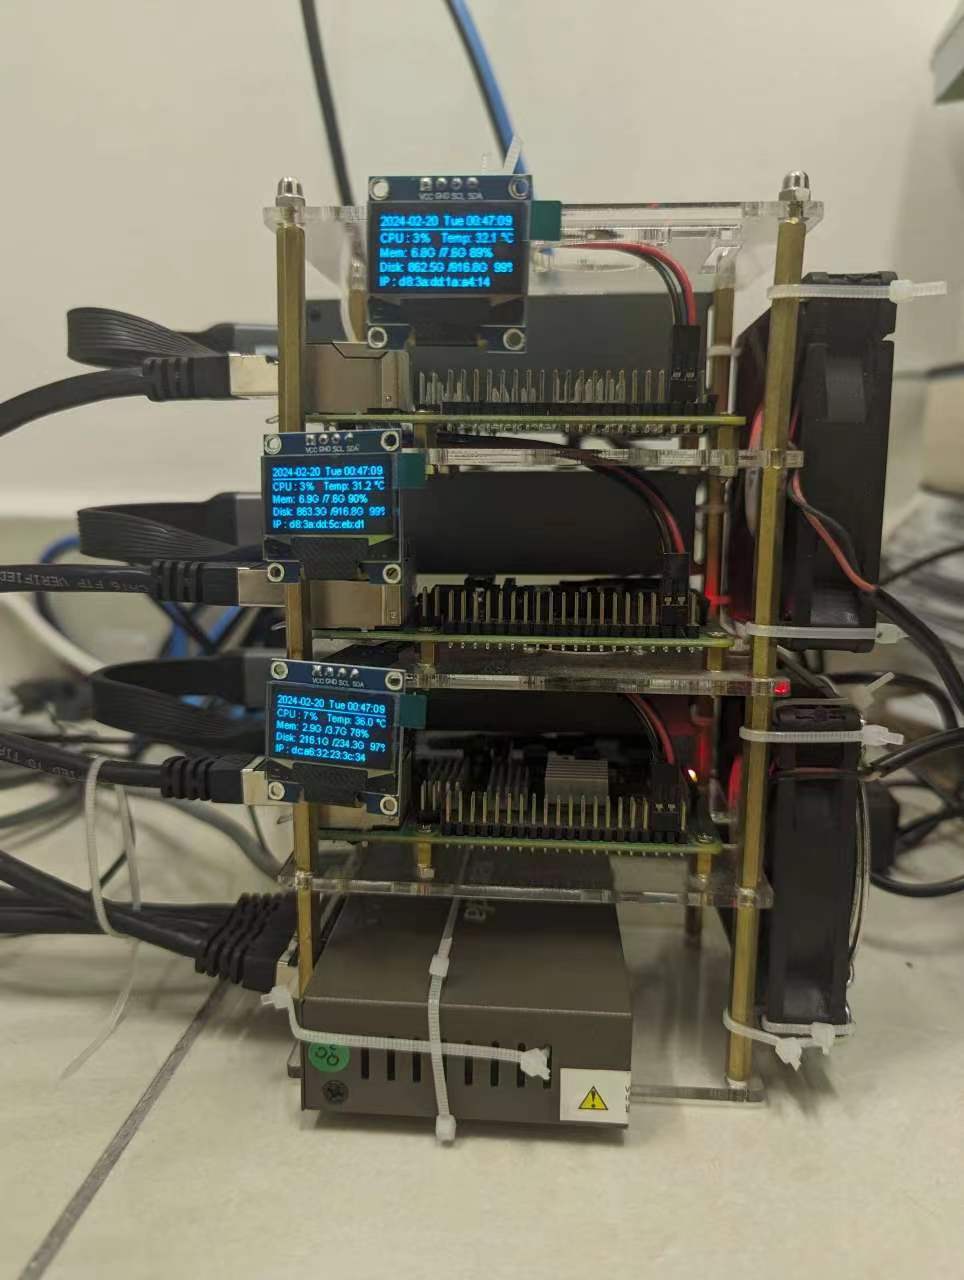
- 2 * Raspberry Pi 4B boards (8GB RAM)
- 1 * Raspberry Pi 4B board (4GB RAM)
- OS: Raspbian Lite
- A unmanaged switch(5 Ports)
- A home router
- Container runtime: Docker
0. Preparation
- Clarify the roles of our machines
- Prepare the hardware
- Install a proper OS
- Configure the cmdline.txt
- Turn off Swap Space
- Assign IP addresses
I
Clarify the roles of our machines:
We want the Pi with 4GB RAM to be the master node, and the other 8GB Pis to become the slave nodes. As we want to practice the NFS storage, we also chose one 8 GB-RAM Pi as our NFS server. But this time, we assume the NFS is out of the K3s system, so we manually control this.
II
Prepare the hardware.
I bought a five-port unmanaged switch to extend the ports of my router, so my home router plays a role in the DHCP server. I use three USB solid disks to install the Raspberry Pi OS for storage. In fact, I also wanted to set up a PXE server and a specialised file server, but the Raspberry Pi is so weak that I gave it up.
III
Install a proper OS
You can download the Rapi OS imager from the official site and write the 64-bit headless OS to these three USB sticks. Remember to configure the user name, password, and hostnames.
IV
After installing the OS and fully starting the Pis, edit the cmdline.txt using SSH. Do not edit the file on a PC when the OS is burned as the Pi will cover the file during the first boot. (Well, I do not like Vim too much, I prefer nano when I do simple editing. )
sudo nano /boot/firmware/cmdline.txt
Insert this content after the last line to enable the cgroup with memory controlling :
cgroup_memory=1 cgroup_enable=memory
Save the file and turn off the swap space:
sudo sed -ri 's/.swap./#&/' /etc/fstab
We always want the K3s and containers to run in RAM to avoid thrashing. Turning off the swap space will help the scheduler determine the real available memory for each node. Then we can update the packages and reboot to apply the changes.
V
Assign IP addresses
Just assign the addresses we want to the router.
1. Install Docker
We need to install Docker on each Pi. There are many ways to install Docker. We use Rancher’s script to install Docker with the specialised version this time. We can refer to this: https://docs.k3s.io/advanced?_highlight=docker#using-docker-as-the-container-runtime.
curl https://releases.rancher.com/install-docker/24.0.4.sh | sh
We can use Ansible to manage the Pis, but this is beyond the scope of the blog. Since we are only working on a few machines, handling things manually is totally manageable.
And you may need to remove Docker completely. Here is a set of commands that will wipe everything.
sudo docker stop $(sudo docker ps -aq)
sudo docker rm $(sudo docker ps -aq)
sudo docker rmi $(sudo docker images -q)
sudo apt remove docker*
sudo rm -rf /var/lib/docker
sudo apt autoremove
Update (May 2025)
Turns out this wasn’t a complete cleanup. I missed the volumes. We can delete volumes by this before we uninstall Docker packages:
sudo docker volume rm $(docker volume ls -q)
2. Install the K3s Master
We can use the K3s official script directly:
curl -sfL https://get.k3s.io | sh -s - --docker
If you want to uninstall, run the script:
/usr/local/bin/k3s-uninstall.sh
Then we can check whether the service started:
sudo kubectl get pods -A
During the first run, the K3s will create some pods in different phases. So, wait a while if you see some pods with failure or error. If all pods cannot run and you failed to execute the hello-world container in Docker, please consider reinstalling Docker or K3S.
3. Install the slaves or agents
As the master node needs to communicate with agent nodes directly, we need to know the address of the master node and the K3S_TOKEN. The master node generates the token, and you can check the token by using this:
sudo cat /var/lib/rancher/k3s/server/node-token
Then you will find something like this:
4g4dfg4jh4hgkj4hjkh542::server:46ghd4hd4fhh4thsz
Please save this as the agent’s credentials for logging in to the master node.
For each agent node, after installing Docker, we can pass the token directly by arguments when we install the K3s in agent mode:
curl -sfL https://get.k3s.io | K3S_URL="https://your_masterIP:6443" K3S_TOKEN="<your_token>" sh -s - --docker
“When a program has nothing surprising to say, it should say nothing.”
——《The Art of Unix Programming》
If there are no explicit errors, everything is assumed to be fine. Then we go back to the master node and check the registered agents:
sudo kubectl get node
You may find the agents do not have roles. No worries, we will assign the tasks later.
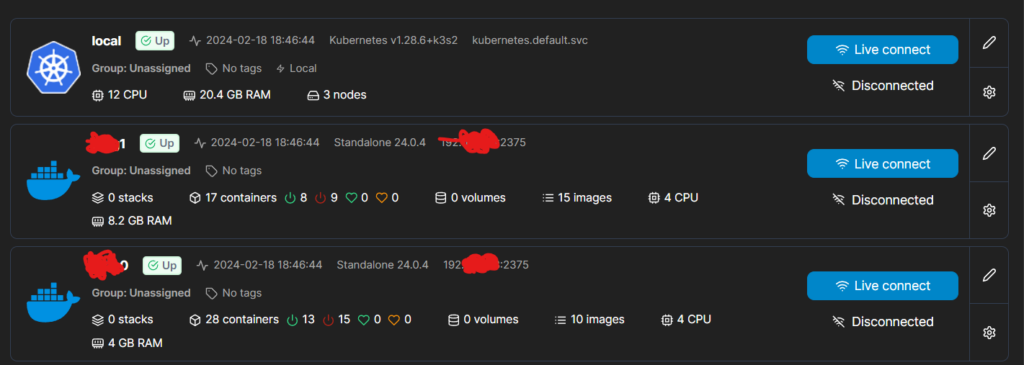
2. Install and configure Portainer
Portainer provides a user-friendly panel and it’s powerful enough to manage everything related to Docker and K3s. Portainer also provides a default YAML file for K3s. In this case, we install Portainer using kubectl directly:
sudo kubectl apply -n portainer -f https://downloads.portainer.io/ce2-19/portainer.yaml
After that, you can log in to the Portainer by https://<your_master_IP>:30779, and follow the instructions from the Portainer to add the K3s cluster.
Here are some tips that help you use Portainer to connect Docker directly.
For each node, including the master node.
You can expose the Docker socket to the internet. This is very dangerous, as anyone can log in to your Docker. So, please set up your firewall to prevent unauthorised access.
First, find the Docker configuration file.
sudo systemctl show --property=FragmentPath docker
My output is /lib/systemd/system/docker.service. Then edit the file:
sudo nano /lib/systemd/system/docker.service
Find the line starting with ExecStart
ExecStart=/usr/bin/dockerd -H fd:// --containerd=/run/containerd/containerd.sock
Insert the tcp://0.0.0.0:2375 between -H and fd, 0.0.0.0 means all IPs.
ExecStart=/usr/bin/dockerd -H tcp://0.0.0.0:2375 -H fd:// --containerd=/run/containerd/containerd.sock
Save the file and restart the service.
sudo systemctl daemon-reload
sudo systemctl restart docker
Then you can connect the Docker socket via Portainer.
Here is the screenshot :
Step 3: Install NFS
In this case, we use an NFS server to manage the storage in the centre for practice. Before we can connect to or establish the NFS server, we need to install these packages:
sudo apt-get install nfs-common nfs-kernel-server -y
Make your folders.
sudo mkdir -p /shared/k3s/web
sudo mkdir -p /shared/k3s/db
sudo chmod 777 /shared/k3s/web
sudo chmod 777 /shared/k3s/db
sudo chmod 777 /shared/k3s
In fact, 777 is dangerous; we can replace it with 755.
Then we can configure the system exposure rules:
sudo nano /etc/exports
We insert the line
/shared <your_ip_range_start_like_10.1.3.9>/<mask>(rw,sync,no_root_squash,no_all_squash)
Update:
At the time, I did not know this was the CIDR notion; the number after the slash is the mask code. Then I changed the code above to “your_ip_range_start_like_10.1.3.9/mask”
Then we restart the NFS service
sudo systemctl enable rpcbind
sudo systemctl enable nfs-server
sudo systemctl restart rpcbind
sudo systemctl restart nfs-server
And use this command to check the export port.
sudo showmount -e
If you can find the NFS rule, we can mount the folder on the master node.
4. Configure the cluster storage
- Mount the PV on the NFS folder.
- Add the PVC so that we can use the PV.
Now we can return to the master node and write the configuration file.
Here is the set of standard commands.
sudo kubectl create -f xx.yaml
sudo kubectl apply -f xx.yaml
sudo kubectl apply -f ./your_yaml_dir
sudo kubectl get pv,pvc
sudo kubectl delete pv your_pv_name
sudo kubectl delete pvc your_pvc_name
We know MySQL needs to store the DB file, and WordPress needs to store the Website. That’s why we create web and db folders.
Now we can deploy our services. Now we create a folder like this:
wp
└──mystorage/
            ├──nfs-db.yaml
            ├──nfs-web.yaml
            ├──claim-db.yaml
            └──claim-db.yaml
Then we edit the yaml files.
#nfs-db.yaml
apiVersion: v1
kind: PersistentVolume
metadata:
  name: pvdb50g
spec:
  capacity:
    storage: 50Gi
  accessModes:
    - ReadWriteMany
  persistentVolumeReclaimPolicy: Recycle
  nfs:
    path: /shared/k3s/db
    server: <NFS_HOST_IP>
  storageClassName: manual
#nfs-web.yaml
apiVersion: v1
kind: PersistentVolume
metadata:
  name: pvweb50g
spec:
  capacity:
    storage: 50Gi
  accessModes:
    - ReadWriteMany
  persistentVolumeReclaimPolicy: Recycle
  nfs:
    path: /shared/k3s/web
    server: <NFS_HOST_IP>
  storageClassName: manual
#claim-db.yaml
#be careful! the "storage" and "storageClassName" and "accessModes" must as the same as in nfs-db.yaml!
kind: PersistentVolumeClaim
apiVersion: v1
metadata:
  name: myclaim-db
spec:
  accessModes:
    - ReadWriteMany
  resources:
    requests:
      storage: 50Gi
  storageClassName: manual
  volumeName: pvdb50g
#claim-web.yaml
#be careful! the "storage" and "storageClassName" and "accessModes" must as the same as in nfs-web.yaml!
kind: PersistentVolumeClaim
apiVersion: v1
metadata:
  name: myclaim-web
spec:
  accessModes:
    - ReadWriteMany
  resources:
    requests:
      storage: 50Gi
  storageClassName: manual
  volumeName: pvweb50g
After creating the configuration YAML files, we can use kubectl get pv,pvc to check whether we successfully configured them. And if we do not set up the volume to “manual”, or binding failed, the upcoming pods will become pending forever, as they will waiting the resources.

5. Install MySQL and WordPress
Please make sure you can download the MySQL image and WordPress. Sometimes, the arm64 platform gets an image with the wrong architecture, so I decided to pack up my own WordPress and MySQL images.
Update(May 2025):
Today, I’m still using my own WordPress and MySQL images. They have been running for two years.
I think I still need to explore a better way to store secret information, like a database password. Here is a simple configuration of secret.yaml. You have to use base64 to write the DB password. Base64 is not an encryption method, so please do not leak the secret.yaml.
Full deployment tree:
wp
├──mystorage/
|           ├──nfs-db.yaml
|           ├──nfs-web.yaml
|           ├──claim-db.yaml
|           └──claim-db.yaml
├──mysql/
|       ├──configmap.yaml
|       ├──secret.yaml
|       ├──service.yaml
|       └──statefulset.yaml
└──wordpress/
            ├──deployment.yaml
            └──service.yaml
#mysql/configmap.yaml
apiVersion: v1
kind: ConfigMap
metadata:
  name: mysql-config
data:
  my.cnf: |
    [mysqld]
    max_connections = 200
#mysql/secret.yaml
apiVersion: v1
kind: Secret
metadata:
  name: mysql-secret
type: Opaque
data:
  username: <YOUR_USER_NAME_IN_BASE64>
  password: <YOUR_USER_PASSWORD_IN_BASE64>
#mysql/service
apiVersion: v1
kind: Service
metadata:
  name: mysql
spec:
  ports:
    - port: 3306
  selector:
    app: mysql
#mysql/statefulset.yaml
apiVersion: apps/v1
kind: StatefulSet
metadata:
  name: mysql
spec:
  replicas: 1
  selector:
    matchLabels:
      app: mysql
  template:
    metadata:
      labels:
        app: mysql
    spec:
      containers:
      - name: mysql
        image: mysql/mysql-server:latest
        env:
        - name: MYSQL_ROOT_PASSWORD
          valueFrom:
            secretKeyRef:
              name: mysql-secret
              key: password
        - name: MYSQL_DATABASE
          value: wordpress
        - name: MYSQL_USER
          valueFrom:
            secretKeyRef:
              name: mysql-secret
              key: username
        - name: MYSQL_PASSWORD
          valueFrom:
            secretKeyRef:
              name: mysql-secret
              key: password
        ports:
        - containerPort: 3306
          name: mysql
        volumeMounts:
        - name: mysql-persistent-storage
          mountPath: /var/lib/mysql
      volumes:
      - name: mysql-persistent-storage
        persistentVolumeClaim:
          claimName: myclaim-db
#wordpress/deployment.yaml
apiVersion: apps/v1
kind: Deployment
metadata:
  name: wordpress
spec:
  replicas: 2
  selector:
    matchLabels:
      app: wordpress
  template:
    metadata:
      labels:
        app: wordpress
    spec:
      containers:
        - name: wordpress
          image: wordpress:latest
          env:
            - name: WORDPRESS_DB_HOST
              value: mysql
            - name: WORDPRESS_DB_NAME
              value: wordpress
            - name: WORDPRESS_DB_USER
              valueFrom:
                secretKeyRef:
                  name: mysql-secret
                  key: username
            - name: WORDPRESS_DB_PASSWORD
              valueFrom:
                secretKeyRef:
                  name: mysql-secret
                  key: password
          ports:
            - containerPort: 80
              name: wordpress
          volumeMounts:
            # name must match the volume name below
          - name: wordpress-persistent-storage
            # mount path within the container
            mountPath: /var/www/html
      volumes:
        - name: wordpress-persistent-storage
          persistentVolumeClaim:
           claimName: myclaim-web
#wordpress/service.yaml
apiVersion: v1
kind: Service
metadata:
  name: wordpress-service
spec:
  type: NodePort
  selector:
    app: wordpress
  ports:
    - port: 80
      targetPort: 80
      nodePort: 30080
So far, we have finished the deployment and can access WordPress on port 30080.
Thank you for reaching the end of the post. I hope I can help you solve your problem and familiarise you with the process of deploying a service on a K3s cluster.
Something more than that:
Building a Raspberry Pi Cluster: From Accidental Purchases to Distributed Computing
This whole project began quite unintentionally—I happened to buy two Raspberry Pis. One was running a personal website, the other a VPN and a plant-watering system. While each served a small purpose, I began wondering if there was a way to make them work together.
Then I came up with an idea: what if I could build something like a tiny supercomputer? As I explored further, I stumbled into a new world of distributed systems, cloud computing, virtualisation, parallel computing, Docker, Kubernetes (K3s), and MPI clusters. These concepts were both technically deep and incredibly fascinating. And when I got that, Raspberry Pi prices started dropping back to normal(similar to before COVID-19), so I picked up a third one.
While most of my work has been on the infrastructure side (which some may dismiss as just “DevOps”), I’ve gained a lot from it. Above all, this journey helped me internalise one of the key principles in modern computing: layered abstraction and encapsulation. Throughout this experiment, I saw this principle in action everywhere:
- Packaging & Isolation with Docker containers
- Orchestration & Scheduling via Kubernetes Pods
- Storage & Persistence through a self-hosted NFS server
- Networking using Kubernetes’ virtual network model
- Access Control with user/group permissions in both Docker and Kubernetes
- Resource aggregation is where the cluster pools together CPU, memory, and disk from multiple physical boards into one machine.
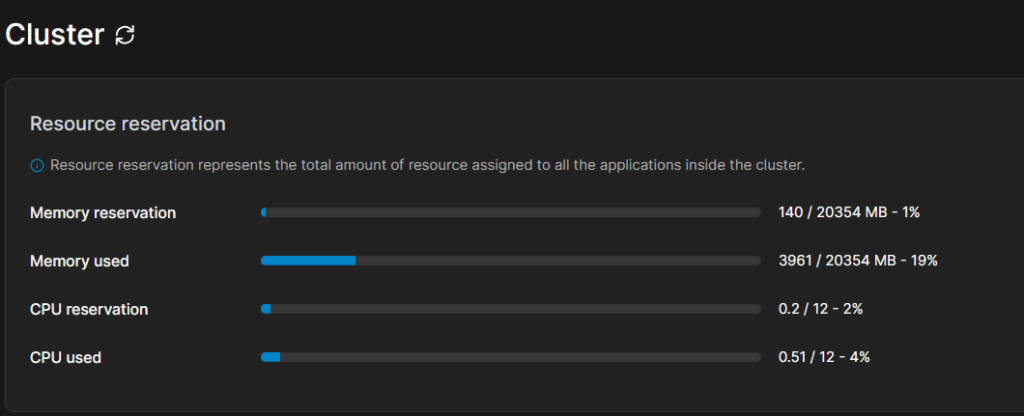
In many ways, this cluster functions like a single machine. It has compute, storage, a scheduler (like a CPU), a virtual network bus, and shared memory. I saw all the system resources — in the Portainer panel, then I joked to myself: I’m fighting a war with more resources than I need.
On the hardware side, I had to carefully plan power, storage, cooling, and even network topology. Building the entire system from the ground up—software and hardware—was incredibly rewarding. My only regret? I haven’t yet put the GPIO pins to good use!
Looking forward, I plan to deploy some of my own applications on the cluster and experiment with MPI for distributed computation across nodes. It’s a work-in-progress, but I’m learning a lot, one layer at a time.
This project was built by integrating and expanding upon several guides and references. It ultimately led to a distributed, redundant, and location-aware WordPress deployment—demonstrating both data resilience and practical use of cloud-native ideas on bare-metal microcomputers.
Here is the reference list. Without the recourse I listed, I cannot finish this practice on my own.
https://yelsew.net/posts/k3s-in-action-first-application
https://stackoverflow.com/questions/53494290/why-do-pods-remain-in-pending-status
https://jhooq.com/storage-classe-name-does-not-match
https://cloud.tencent.com/document/product/457/42948
https://blog.csdn.net/marlinlm/article/details/122150232
https://blog.csdn.net/shijie1103/article/details/114367156
https://kubernetes.io/zh-cn/docs/tutorials/stateful-application/mysql-wordpress-persistent-volume
https://cloud.tencent.com/document/product/457/42948
https://blog.csdn.net/qq_34158598/article/details/81976063
https://zhuanlan.zhihu.com/p/494054143
https://www.runoob.com/w3cnote/linux-check-port-usage.html

Views: 38