Emm, in fact, this is a sad story 🙁 ……
So I will not write it in details.
…… Though our project scored high, my final mark is not good. Emm, forget it! At least we finally realize the model and it performs well.
1
I will show my code first.
import numpy as np
from numpy import *
from numpy import linalg as la
from collections import Counter
import cv2
import os
import urllib
import urllib.request
import shutil
def reading_images(orlpath,k,n):
""" # arg: k people in total, and each person has n photos
# The path of the parameter orl
# This function returns a list of all photos
# Read the folders in the order of first the name and then the serial number"""
imagesArray_gray = []
for i in range(k):
for j in range(n):
full_path = orlpath + '//s' + str(i+1) + '//' + str(j+1) + '.jpg'
img = cv2.imread(full_path)
img = cv2.GaussianBlur(img,(5,5),0)
img_gray = cv2.cvtColor(img, cv2.COLOR_RGB2GRAY)
face_resized = cv2.resize(img_gray, (92, 112))
imagesArray_gray.append(face_resized)
return imagesArray_gray
def gen_train_field(img,face_number):
""" # Store the photos in a two-dimensional np array after upscaling
# First apply for the space, and then upscale each face, after the upgrade
# attached to train_face and return"""
train_face = np.zeros((face_number, 10304))
for j in range(face_number):
img_Vector = np.reshape(img[j], (1,10304))
train_face[j, :] = img_Vector
return train_face
def picture_2_ary(orlpath,k,n):
"""# Integrate the functions of photo reading and dimension enhancement to form a matrix
# The arg orl is the path, k is the number of people, and n is the number of photos of each person
# Return a np array"""
return gen_train_field(reading_images(orlpath,k,n),k*n)
def PCA(train_field, r):
"""#PCA
# The arg is the train_field training set, and r is the reduced dimension
# Return dimensionality reduced data (mat), average face (one-dimensional array), eigenvector (mat)"""
train_field = np.float32(np.mat(train_field))
row,col = np.shape(train_field)
ave_face = np.mean(train_field, 0)# Average
train_mean = train_field - np.tile(ave_face, (row, 1))
Cov_m = train_mean * train_mean.T # Find the covariance matrix
Cov_m = (Cov_m + Cov_m.T)/2
eig_lbd,eig_V_temp = np.linalg.eig(Cov_m) # Find eigenvalues and eigenvectors
sorted_indices = np.argsort(eig_lbd)# Sort the eigenvalues
eig_V_reduced = eig_V_temp[:,sorted_indices[:-r-1:-1]]# Choose the top r largest eigenvectors
eig_V_reduced = train_mean.T * eig_V_reduced
for i in range(r):
eig_V_reduced[:, i] = eig_V_reduced[:, i] / np.linalg.norm(eig_V_reduced[:, i]) #Get unit vector
compressed_data = train_mean * eig_V_reduced #Calculate the reduced data
return compressed_data, ave_face, eig_V_reduced
def recognize_ncc(compressed_data,test_vector):
"""# NCC classifier
# arg: compressed_data training set (mat), test_vector face to be tested (one-dimensional mat)
# Return value: the name label of the closest number, the closest distance of dist_test,the picture number"""
n,_ = np.shape(compressed_data)
closest = 0
test = float("inf")
for i in range(n):
dist_test = np.sqrt(np.sum(np.square(compressed_data[i,:] - test_vector)))
if dist_test < test:
test = dist_test
closest = (i//5+1)
pic = i % 5 +1
return closest,dist_test, pic
def recognize_knn(compressed_data,test_vector,k,n):
"""# KNN classifier
# arg: compressed_data, training set: test_vector, face to be tested (one-dimensional mat): k is the minimum count of the classifier, n is the number of photos of each person
# Return value: the name label of the closest number, the closest distance of dist_test"""
# Calculate the distance of each row of data
distances = np.sqrt(np.sum(np.square(compressed_data - test_vector), axis=1))
# Get the number of k minimum values in distances
k_smallest_indices = (np.argsort(distances)[:k])
# Associate it with the number
number= k_smallest_indices//n+1
# Sort the output by the number with the most occurrences
most_common_label = Counter(number).most_common(1)
dist_test=distances[(most_common_label[0][0]-1)*5]
return most_common_label[0][0],dist_test
def update_faces(face_detectorr_path,ORL_path,n):
"""# Take a photo and update the face
# arg face_detectorr_path, face detector path ORL_path to be written orl path
n is the Number of photos for each person
# Return NULL"""
cap = cv2.VideoCapture(0)
face_detector=cv2.CascadeClassifier(face_detectorr_path)
number=int(input("How many people's pictures do you want to update?"))
for i in range (number):
print('Please enter the number of the people , his faces will be replaced ')
print('Only five photos, press s to capture')
name = input()
count=0
while(1):
if count==5:
break
if cap.isOpened()==0:
print("capcture error, exit...")
exit()
ret_flag,Vshow = cap.read()
Vstore=cv2.cvtColor(Vshow, cv2.COLOR_RGB2GRAY)
face_detected=face_detector.detectMultiScale(Vstore,1.1,5,cv2.CASCADE_SCALE_IMAGE,(100,100),(300,300))
for x,y,w,h in face_detected:
cv2.rectangle(Vshow,(x,y),(x+w,y+h),color=(0,0,255),thickness=2)
cv2.circle(Vshow,center=(x+w//2,y+h//2),radius=w//2,color=(0,255,0),thickness=1)
cv2.imshow("Capturing... :)",Vshow)
k = cv2.waitKey(1) & 0xFF
if k == ord(' '):
break
if k == ord('s'):
face_detected=face_detector.detectMultiScale(Vshow,1.1,5,cv2.CASCADE_SCALE_IMAGE,(100,100),(300,300))
if len(face_detected) == 0:
print("There is no face,try again!")
continue
if len(face_detected) > 1 :
print("More than one face,try again!")
continue
else:
for x,y,w,h in face_detected:
face=Vstore[y:y + h, x:x + w]
face=cv2.resize(face,(92, 112))
cv2.imwrite(str(ORL_path) + "//s" + str(name) + "//" + str(count+1) + ".jpg",face)
print("success to save"+str(name)+"s"+str(count+1)+".jpg")
print("---------------------------------")
count=count+1
cv2.destroyAllWindows()
if __name__ == '__main__':
k=40
n=5
orlpath0="D://ORL0"
orlpath1="D://ORL1"
face_detectorr_path="D:\\cascade.xml"
face_detectorr_path="D:\\opencv\\sources\\data\\haarcascades\\haarcascade_frontalface_alt2.xml"
face_detector=cv2.CascadeClassifier(face_detectorr_path)
ary0=picture_2_ary(orlpath0,k,n)
ary2=picture_2_ary(orlpath1,k,n)
print("Performace of NCC")
for d in range(1,200,10):
train_field_compressed,ave_face,eig_V_reduced = PCA(ary0,d)
sum=0
for z in range (k*n):
temp=np.float32(np.mat(ary2[z])-ave_face)*eig_V_reduced
result,_,_=recognize_ncc(train_field_compressed,temp)
if ( result== ((z//n+1)) ):
sum+=1
print("When the dimenstion is",d," accuracy",(np.float32(sum))*100/(k*n))
print("Performance of KNN")
for d in range(1,200,10):
train_field_compressed,ave_face,eig_V_reduced = PCA(ary0,d)
train_field_compressed=np.array(train_field_compressed)
sum=0
for z in range (k*n):
temp=np.float32(np.mat(ary2[z])-ave_face)*eig_V_reduced
temp=np.array(temp)
result,_=recognize_knn(train_field_compressed,temp,2,5)
if ( result== ((z//n+1)) ):
sum+=1
print("When the dimenstion is",d," accuracy",(np.float32(sum))*100/(k*n))
update_faces(face_detectorr_path,orlpath0,5)
ary0=picture_2_ary(orlpath0,k,n)
train_field_compressed,ave_face,eig_V_reduced = PCA(ary0,31)
aveshow=np.reshape(np.array(ave_face),(112,92))
aveshow=aveshow.astype(np.uint8)
cv2.imshow('ave',aveshow)
cap = cv2.VideoCapture(0)
while True:
flag,frame=cap.read()
if not flag:
break
frame_gray=cv2.cvtColor(frame,cv2.COLOR_RGB2GRAY)
face_detected=face_detector.detectMultiScale(frame_gray,1.05,5,0,(100,100),(300,300))
result=0
for i in range(len(face_detected)):
imagesArray_gray = []
x=face_detected[i][0]
y=face_detected[i][1]
w=face_detected[i][2]
h=face_detected[i][3]
face=frame_gray[y:y + h, x:x + w]
face=cv2.resize(face,(92, 112))
face = cv2.GaussianBlur(face,(5,5),0)
cv2.imshow('face'+str(i),face)
imagesArray_gray.append(face)
real_time_test=gen_train_field(imagesArray_gray,1)
img_Vector = np.reshape(face, (1,10304))
#result, distance = recognize_knn(np.array(train_field_compressed),np.array((real_time_test[0,:]-np.tile(ave_face, (1, 1)))*eig_V_reduced),2,5)
result, distance, pic = recognize_ncc(np.array(train_field_compressed),np.array((real_time_test[0,:]-np.tile(ave_face, (1, 1)))*eig_V_reduced))
cv2.rectangle(frame,(x,y),(x+w,y+h),color=(0,0,255),thickness=2)
cv2.circle(frame,center=(x+w//2,y+h//2),radius=w//2,color=(0,255,0),thickness=1)
cv2.putText(frame,"Face"+str(i)+" is "+str(result)+" "+"expression"+str(pic), (x + 15, y - 15), cv2.FONT_HERSHEY_SIMPLEX, 0.75, (0, 255, 0), 1)
full_path = orlpath0 + '//s' + str(result) + '//' + str(pic) + '.jpg'
img_result = cv2.imread(full_path)
mapping_back=img_Vector*eig_V_reduced*eig_V_reduced.T+ave_face
mapping_back=np.reshape(np.array(mapping_back),(112,92))
mapping_back=mapping_back.astype(np.uint8)
cv2.imshow('mapping_back',mapping_back)
cv2.imshow("Face"+str(i)+" is ",img_result)
cv2.imshow('Showing... :)',frame)
del imagesArray_gray
cv2.imshow('Showing... :)',frame)
if ord('q') == cv2.waitKey(1):
break
As you can see, this is a project written in Python, based on OpenCV.
This is the definition of OpenCV from its official website: OpenCV (Open-Source Computer Vision Library) is an open-source computer vision and machine learning software library. OpenCV was built to provide a common infrastructure for computer vision applications and to accelerate the use of machine perception in commercial products.
2
Project Design:
Part1
We separate the ORL Database into two groups, group one is for learning, and the other is for testing. Each group has 40(the variable is k) people, and everyone has 5 (the variable is n) faces. In this part, we explore how the reduced dimension and classifier affect the accuracy rate.
Part2
And we also add real-time reorganization. To demonstrate the system’s ability to resist confusion, for real-time recognition, we still use the original database but substitute the face of 1 person by 1 group member before the system starts.
PCA:
The full name of PCA is Principal Component Analysis. PCA is a linear way to deal with data. What’s the meaning of “deal with”? The most significant function is to compress data. It’s a lossy compression. In other words, it can help us to reduce data dimensionality, or, reduce the number of coordinate axes. So, after PCA, there must be some information to be reduced. We can choose the number of dimensions.
This time I will just introduce the core part of the project.
How should we read and turn the picture into a matrix (or 2d array)? How can we combine the data set together?
As we all know, raster images use a pixel grid to represent the images. The other type is vector graphics. We do not use this kind of picture, just skip it. The commonly used raster images with color have more than one bitmap data for one pixel. For example, the information of one pixel has its gray information and color information. You may have heard RGB or BGR. Both of them use three numbers to represent one pixel. But in this example, we do not need color information. The features of a face are shape and color transition. We do not care whether you are Avatar or not, right? So, we use the library in OpenCV to convert these colorful pictures into gray pictures. Then we can get pictures with one color channel, whose pixel only has one number, from 0-255 in decimal.
Fine. From now on, the pictures have been turned into a 2-D matrix. But we want to combine these pictures into one matrix. So, we need to raise the dimension of one picture. In this step, we rearrange the sequence of pictures and turn the picture from 2D into the dimension of the number of pixels. In other words, to turn a piece of paper into a line. You can also say it is not raising the dimension, it is reducing the dimension. It’s up to you. Haha. But I define them into one row here. It is raising dimensions.
Then we combine these pictures with higher dimensions row by row. The number of the row is the number of pictures. And the column number is the number of total pixels’ number in each picture. After that, we finished the preparation of raw picture data.
How to do PCA?
Come back to the PCA function.
def PCA(train_field, r):
"""#PCA
# The arg is the train_field training set, and r is the reduced dimension
# Return dimensionality reduced data (mat), average face (one-dimensional array), eigenvector (mat)"""
train_field = np.float32(np.mat(train_field))
row,col = np.shape(train_field)
ave_face = np.mean(train_field, 0)# Average
train_mean = train_field - np.tile(ave_face, (row, 1))
Cov_m = train_mean * train_mean.T # Find the covariance matrix
Cov_m = (Cov_m + Cov_m.T)/2
eig_lbd,eig_V_temp = np.linalg.eig(Cov_m) # Find eigenvalues and eigenvectors
sorted_indices = np.argsort(eig_lbd)# Sort the eigenvalues
eig_V_reduced = eig_V_temp[:,sorted_indices[:-r-1:-1]]# Choose the top r largest eigenvectors
eig_V_reduced = train_mean.T * eig_V_reduced
for i in range(r):
eig_V_reduced[:, i] = eig_V_reduced[:, i] / np.linalg.norm(eig_V_reduced[:, i]) #Get unit vector
compressed_data = train_mean * eig_V_reduced #Calculate the reduced data
return compressed_data, ave_face, eig_V_reduced
The first thing we do is data mean adjustment. train_field is the raw picture data. Each row is a face to be compressed in this big matrix. Actually, we should calculate the mean value for each column, and combine them into a new row. And we call this new row “average face“. After that, we let every row minus the average face.
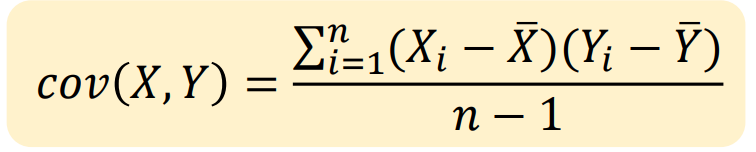
Then it’s time to calculate the covariance matrix. Thanks to the first step, we can do it in a simple and fast way-train_mean * train_mean.T. You may ask why. It is the definition of covariance.
The third step is to find and sort eigenvalues and eigenvectors. We do not want to solve it by hand, so we use NumPy to solve it. Take a look at these eigenvectors, you can find each of the eigenvectors has the pixel number rows and one column. What if we transpose it? Whoa~ It is Eigenface! You can even visualize it. In fact, rather than saying reduce the dimension of the pictures, it is better to say that, we map all of the pictures into the domain of eigenfaces chosen by us. As many eigenfaces as choose, then as many dimensions, we reduce to. Then we form the Eigen matrix. It’s easy. Just line the eigenfaces up.
After that, we earned our powerful tool–the Eigenmatrix. In linear algebra, we let matrices A and B. We can think that the product of AB is an operation that transforms A into the codomain of B. So if we want to compress the dimension of pictures, we just turn the picture(s) into line(s) and multiply it by the Eigen matrix. The product is the compressed data we need.
Then the PCA is finished. The dimension of all the pictures( including training data, the eigenfaces, and the face to be tested)
The next step is to classify. The faces can be recognized as points in the multi-dimension. So, we choose a simple classifier–NCC. We can calculate the distances between the tested face and trained faces. The point closest to the tested face is our result. Then we print out its label.
Views: 165
太卷了吧 用英文写